

Facial Pressure Points: A Gentle Acupressure Guide
12 min readYou close your laptop, press the spot between your eyebrows, and realize your whole face has been bracing through the afternoon. Then you search for facial pressure points and find diagrams covered in dots, codes, and promises about everything from wrinkles to internal organs. That is a lot to ask of one fingertip.
The useful version is much simpler. Facial acupressure uses a thumb or fingertip to hold or gently massage selected areas without breaking the skin. For a first session, use clean hands, choose a few easy-to-find points, and apply comfortable pressure for about 20 to 30 seconds. It should never hurt.
This guide maps five common points and turns them into a short routine. The map is a practical way to organize gentle touch, not a diagnostic chart, a treatment plan, or a method for reshaping your face.
What are facial pressure points?
Facial pressure points are small areas used in acupressure, a hands-on practice connected with traditional East Asian medicine. The points have traditional names and letter-number codes, which is why you may see labels such as EX-HN3 or ST6 beside a point name.
Those codes identify locations within a traditional system. They do not mean a tender point reveals a problem with a particular organ. A face chart also cannot diagnose the cause of pain, swelling, skin changes, or any other symptom.
In a beginner home routine, the practical action is a stationary hold or tiny circle with a fingertip. You are not trying to reach a hidden structure, force a release, or create a dramatic sensation. If the point is hard to locate, use the broader area shown below and keep the pressure soft.
Acupressure is not acupuncture
The names sound similar, but the methods are different. Acupressure uses pressure at the skin’s surface. Acupuncture uses specialized needles that penetrate the skin.
Do not use needles, lancets, pins, or sharp tools for a home acupressure routine. Pressing a point with your finger does not turn the session into DIY acupuncture.
Facial pressure point chart: five beginner landmarks
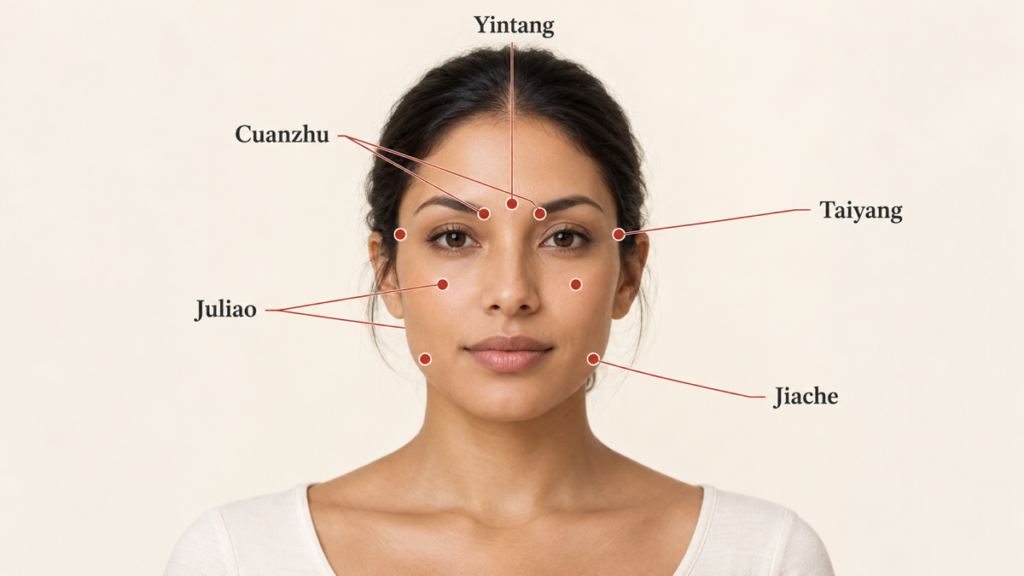
Formal point descriptions use precise anatomical landmarks. The names and locations for Cuanzhu (BL2), Juliao (ST3), and Jiache (ST6) below follow the WHO Standard Acupuncture Point Locations in the Western Pacific Region. Yintang (EX-HN3) is cross-checked against a published randomized-trial protocol, and Taiyang (EX-HN5) against a peer-reviewed clinical report that used the WHO location standard.
For a beginner routine, treat the chart as a set of broad, external touch areas rather than clinical point-location instructions. Use it as a text-based map: Yintang is the single point at the center, while the brow, temple, cheek, and jaw areas appear on both sides of the face. Stay on comfortable tissue, away from the eyeball, nostrils, lips, and front of the throat.
| Common point | Traditional label | Where to find the area | Beginner contact |
|---|---|---|---|
| Between the eyebrows | Yintang, EX-HN3 | The midpoint between the inner ends of your eyebrows | Rest one fingertip on the skin without angling toward the nose or eyes |
| Inner brow area | Cuanzhu, BL2 | The small indentation at the inner end of each eyebrow | Use a very light touch and stay on the brow bone |
| Temple area | Taiyang, EX-HN5 | The shallow temple depression behind the midpoint between the outer eyebrow and outer corner of the eye | Make a tiny, slow circle without digging |
| Upper cheek area | Juliao, ST3 | Directly below the pupil, level with the lower edge of the side of the nose | Use light contact on the cheek, away from the lower eyelid and nostril |
| Jaw muscle area | Jiache, ST6 | About one finger-width forward and upward from the angle of the jaw, at the masseter prominence; lightly clench once to find it, then relax | Use two flat fingertips or one broad thumb pad |
These are not the only acupressure points for face routines. They are simply five landmarks that keep a first routine easy to follow without turning your bathroom mirror into a study guide.
How much pressure should you use?
Aim for clear contact without pain. The U.S. Department of Veterans Affairs’ acupressure self-care handout advises using pressure that feels good rather than painful and demonstrates 30-second holds for general body points. That timing is a practical starting point, not a proven dose for cosmetic facial acupressure.
Use less pressure near the eyes and temples than you would on the jaw muscle. Your fingertip may make a shallow impression in the skin, but it should not leave a deep dent, bruise, or lasting mark. You should be able to breathe normally and keep your teeth unclenched.
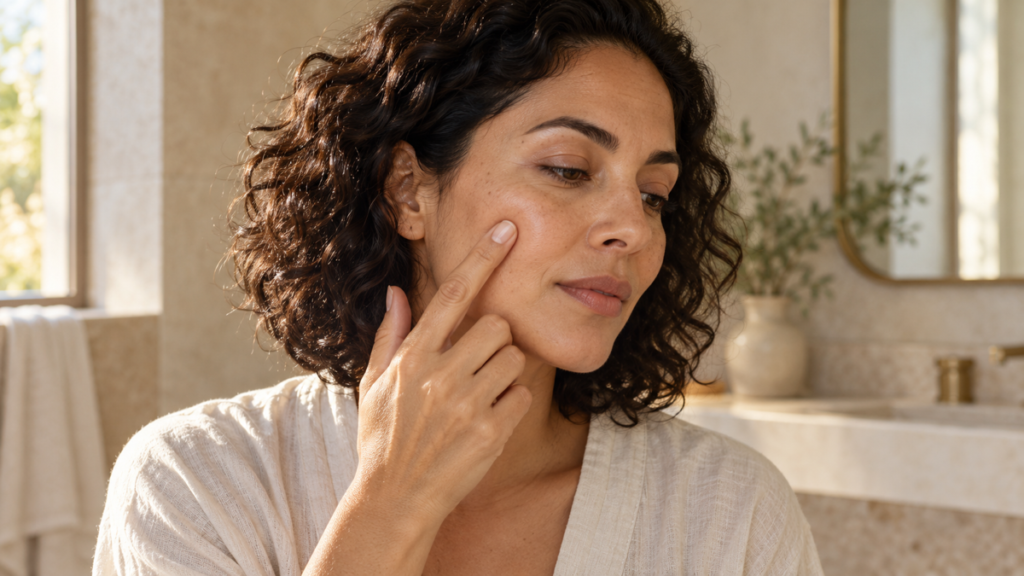
Try this quick pressure check:
- Place a fingertip on the point without pressing.
- Add pressure gradually until you feel steady contact.
- Back off if you notice pain, pulsing discomfort, sharpness, tingling, or numbness.
- Hold still or make a circle no larger than a pea.
- Release slowly rather than snapping your finger away.
If you keep wondering whether you are pressing hard enough, go lighter. Precision and force are not the same thing.
A gentle five-minute face pressure point massage
This face pressure point massage uses all five areas from the chart, but you can stop after two or three. Treat each time range as a short first-session guide, and release sooner whenever the contact stops feeling comfortable. There is no prize for completing every dot when your skin has had enough.
1. Prepare your hands and face
Wash and dry your hands. Remove rings, check that your nails will not scratch, and start with clean, comfortable skin.

You do not need oil for a stationary hold. If you plan to add circles or gliding strokes, use a small amount of a familiar moisturizer so your fingers do not drag. Do not combine a new skin-care active with a new massage technique in the same session.
2. Hold the point between your eyebrows
Place one fingertip midway between the inner ends of your eyebrows. Let your forehead stay smooth and hold for 20 to 30 seconds while breathing at your normal pace.
Rest your fingertip on the skin without angling the pressure toward your nose or eyes. Release if the contact creates a headache, eye pressure, dizziness, or any unpleasant sensation.
3. Touch the inner brow points
Place one fingertip at the inner end of each eyebrow. Stay on the firm brow bone, not the soft eye socket. Hold for about 15 to 20 seconds with barely more than the weight of your fingertips.
Skip this point if the eye area is irritated, swollen, recently treated, or too sensitive to touch. Do not press the eyelids or eyeballs.
4. Circle over the temples
Move your fingertips to the soft areas beyond the outer ends of your eyebrows. Make two or three tiny circles, then hold still for 20 seconds.
Temple pressure should feel quiet, not intense. Avoid digging for the “perfect” spot or following a pulse with your finger. If the area feels tender, reduce the pressure or leave it out.
5. Press the upper cheeks
Look straight ahead, then place one fingertip on each cheek directly below the pupil and level with the lower edge of the side of your nose. Press gently for 15 to 20 seconds.
Keep this contact broad. Do not push upward into the eye socket, press beside the nostrils, or use your nails. This step should feel like a soft pause on the cheeks, not an attempt to lift them.
6. Finish over the jaw muscles
Clench very lightly for one second to feel the jaw muscles engage, then let your teeth separate. Place two flat fingertips over each relaxed muscle and hold for 20 to 30 seconds. You can add one slow circle if it feels comfortable.
Stay on the fleshy muscle rather than pressing into the jaw joint in front of the ear or hooking your fingers beneath the jawbone. End the routine here, or make one light outward glide across each cheek if your skin has enough slip.
Can pressure points on the face relieve tension?
If you search for pressure points on the face to relieve tension, you probably want a small, practical reset—not another crowded diagram. Gentle touch may help you notice that you are squinting, furrowing your brow, or holding your teeth together. Pausing, softening those muscles, and breathing normally can feel calming in the moment.

That experience is subjective. Research on acupressure tends to test specific point combinations for specific conditions, so results from one protocol do not establish what this five-point face routine can do.
Use comfort as the goal. A face that feels less braced for a few minutes is a realistic outcome. Keep the purpose narrow: a comfortable pause, not treatment for pain, sinus symptoms, headaches, tooth pain, or jaw disorders.
What can facial acupressure realistically do for your appearance?
Facial acupressure can give you a structured way to slow down and use gentle touch. Your skin may look temporarily pinker where you pressed, and a relaxed expression can look different from a tense one. Neither effect proves that the face has been lifted or reshaped.
Direct evidence for cosmetic facial acupressure is limited. A 2025 systematic review of mechanical facial techniques included 12 small, varied studies of facial exercise, myofunctional therapy, and manual massage. The authors found the evidence insufficient to establish reliable aesthetic effects. That review was not a test of this five-point routine, which is exactly why the claims here stay modest.
Facial pressure work has not been shown to permanently lift skin, erase wrinkles, change bone structure, remove facial fat, increase collagen on command, or “detox” the face. A sore point is not proof that toxins are leaving or that a treatment is working.
If appearance is your only measure, the routine can quickly turn into a daily inspection. A better test is simpler: did the contact feel comfortable, did your skin stay calm, and was the pause useful in your day?
Facial acupressure vs. facial massage
Acupressure usually focuses on one area at a time with a still hold or very small circle. General facial massage uses broader strokes across the cheeks, forehead, jaw, or neck. An acupressure facial massage can combine both, but the methods do not need to become one long routine.
If you prefer movement to stationary pressure, our guide to five gentle facial massage techniques explains glides, circles, holds, and tapping. For a lower-face sequence that avoids pressure-point claims, use the gentle jawline massage routine.
Tools create another kind of contact. A roller moves across the skin instead of holding one point, and a chilled roller adds cold. If cooling is the part you actually want, the ice roller guide is more relevant than adding an ice cube to a pressure-point massage.
Choose one method per first session. Combining pressure, scraping, rolling, and cold makes it harder to tell what your skin tolerates.
When should you skip facial pressure point massage?
Skip any area with a wound, numbness, severe swelling, or active infection. The VA’s general acupressure guidance lists these as areas where acupressure should not be used and says to stop if pressure causes discomfort or dizziness. For this face routine, use pressure only on calm, intact skin with normal sensation.
Pause the routine after facial or dental procedures, injectables, laser treatments, peels, or surgery unless your aftercare instructions specifically allow pressure. A generic facial pressure point chart does not override procedure-specific restrictions.
During the routine, stop if you notice:
- pain, burning, or a sharp electric feeling;
- dizziness or a worsening headache;
- new numbness or tingling;
- increasing redness, itching, swelling, or skin irritation;
- eye discomfort or a change in vision.
Do not press on the eyeballs, mobile eyelids, nostrils, lips, front of the throat, or a visibly pulsing vessel. Do not use hard tools to make a point feel “deeper.”
Common facial pressure point massage mistakes
Treating the chart like a test
You do not need millimeter accuracy for a gentle wellness pause. Facial proportions differ, and even professional point-location systems use anatomical landmarks and individual measurements. Stay in the broad area, keep the pressure comfortable, and skip any point you cannot locate without poking around.
Pressing until the spot hurts
Pain is not evidence that you found the point. It is a reason to reduce the pressure or stop. Acupressure should not leave bruises, nail marks, or soreness that follows you into the next day.
Working too close to the eyes
The inner brow and upper cheek points sit near delicate structures. Stay on the bone or cheek, use very light contact, and keep fingers off the eyeball and eyelid.
Turning a hold into aggressive rubbing
Fast circles add friction. If the skin moves, folds, or heats up quickly, either add a familiar product for slip or return to a still hold.
Assigning every sensation a meaning
Tenderness may reflect pressure, muscle use, skin irritation, or ordinary sensitivity. A point does not reveal the health of an organ, and one side feeling different from the other is not a diagnosis.
Expecting a sculpted result
Pressing harder will not sharpen your cheekbones or jaw. Keep the routine because the gentle pause feels useful, not because a filtered before-and-after promised a new facial structure.
FAQ
What are the main acupressure points for the face?
There is no single short list that represents every traditional school or clinical protocol. This beginner routine uses five common landmarks: between the eyebrows, the inner brow area, the temples, the upper cheeks, and the jaw muscles. The points in the chart are for gentle external pressure, not diagnosis or treatment.
How long should you hold facial pressure points?
Start with 15 to 30 seconds per point. That range keeps a first routine brief and makes it easier to notice how your skin and face respond. It is not a research-backed prescription for a cosmetic result. Release sooner if the pressure becomes uncomfortable.
Do you need oil for an acupressure face massage?
No. A stationary press works on clean, dry skin. Use a small amount of familiar moisturizer only if you add circles or gliding strokes and your fingers begin to drag.
Is facial acupressure the same as acupuncture?
No. Facial acupressure uses fingers or thumbs on the surface of the skin. Acupuncture uses specialized techniques, most commonly thin needles that penetrate the skin. This routine is acupressure only.
Your simplest next step
Forget the crowded diagram for one evening. Pick two facial pressure points—the space between your eyebrows and the jaw muscle are easy places to start—and use comfortable contact for 20 seconds each. If that feels good, add the temples next time.
The useful habit is not memorizing every code. It is keeping your hands clean, your pressure gentle, and your expectations grounded.